|
 |
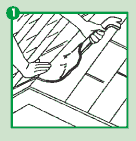
Remove
ridge cap shingles along entire length of
roof. |
|
|
|
 |
|
-
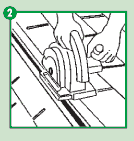
Measure 1" from ridge peak on each
side of ridge. For ridge board construction
measure 1-3/4" on each side of ridge.
-
Snap chalk line along entire length of
ridge.
- Cut
opening in sheathing along ridge. DO NOT
CUT through roof trusses or ridge board.
- Remove
sheathing to create slot.
- Leave
a minimum of 12" of sheathing closed
at each end of ridge.
|
 |
|
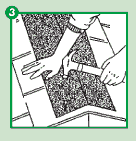
Tack
one end of Roof Saver® ridge vent, with
netting side down, over the slot to hold in
place at one end of the ridge. Unroll entire
length of vent, pull to remove sags and tack
in place so vent is snug and centered over
slot. If more than one piece of Roof Saver®
is needed, simply butt the multiple pieces
together and tack in place with a nail. |
|
|
|
 |
|
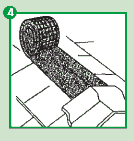
Install
ridge cap shingles directly over Roof Saver®.
Use galvanized roofing nails included in package
to secure in place. When properly installed,
Roof Saver® fills the 3/4" space
between the underside of the cap shingle and
the top surface of the roof shingles. Do NOT
drive nails through shingle. |
|
|
|
| |
|
NAILS
INCLUDED |
|
|
|
|
|
|
Quitar
las planchillas del caballete de techo a lo
largo de todo el caballete. |
|
|
|
|
|
-
Medir 1" desde la punta de cada lado
del caballete. Para la construccion de
un caballete de tablero, medir 13/4"
en cada lado del caballete.
- Con
la ayuda de una tiza, trace una linea
a lo largo del caballete.
- Cortar
la apertura de la funda a lo largo del
caballete. NO CORTE las ataduras del techo
ni el borde del caballete.
- Quitar
la funda para crear una ranura.
- Dejar
un minimo de 12” de funda cerrada
en cada tremo del caballete.
|
|
|
|
|
|
Clavar
con tachuelas un extremo del Roof Saver®
ventilador para caballete (la malla para abajo)
en la ranura para sostenerlo en su lugar en
uno de los
extremos del caballete. Desenrollar el ventilador
completamente, ir tirando para eliminar las
holguras y clavar en su lugar para ajustarlo
centrarlo con la
ranura. Si se necesita más de un rollo
del Roof Saver® ventilador para caballete,
simplemente, junte múltiples pedazos
y clávelos en su lugar con tachuelas. |
|
|
|
|
|
Instalar
las planchillas directamente sobre el Roof
Saver® ventilador para caballete de techo.
Sujetar las
planchillas y el ventilador para caballete
al techo usando clavos incluidos con el ventilador
de caballete. Cuando instalo apropiadamente,
Roof Saver® llena el
espacio de 3/4" entre la cara inferior
de la planchilla de la tapa y la superficie
primera de las planchillas de techo. NO aplaste
los clavos hasta las planchillas. |
|
|
|
|
|
TACHUELAS
INCLUIDO. |
|